How to Decorate a Christmas Tree Step by Step
How to decorate a Christmas tree step by step, in the right order. Lights, ribbon, garland, and ornaments so your tree looks full and cohesive, not cluttered.
To decorate a Christmas tree, work in layers… fluff the branches, add lights, weave in ribbon or garland, hang large ornaments, then small ones, then fillers, the topper, and the skirt.
Keep to a three-color palette and tuck ornaments deep into the branches, not only on the tips. If your tree looks fine but never looks like the ones you save, the order is almost always the reason. There is plenty of time to plan it, and one evening is enough to finish.
Key Takeaways
Table of contents
- What order do you decorate a Christmas tree?
- How do you fluff a Christmas tree so it looks full?
- How many lights do you need, and how do you put them on?
- How do you add ribbon or garland to a Christmas tree?
- How do you place ornaments so the tree looks balanced?
- How do you choose ornaments that make a tree look cohesive?
- How can you make kids’ ornaments and sentimental pieces look cohesive?
- What are the most common Christmas tree decorating mistakes?
- Frequently Asked Questions
- Final Thoughts on Decorating a Christmas Tree
Disclaimer: This post contains affiliate links. To read more, check out our disclosure policy. As an Amazon Associate, I earn from qualifying purchases

What order do you decorate a Christmas tree?
You decorate a Christmas tree in eight steps: fluff, lights, ribbon or garland, large ornaments, small ornaments, fillers, topper, and skirt. Each layer builds on the one before it.
- Fluff. Shape every branch tip so the tree looks full before anything goes on it.
- Lights. Weave them in and out of the branches, working from the trunk outward.
- Ribbon or garland. Add a long line of color and texture to guide the eye.
- Large ornaments. Place your biggest pieces first, spaced evenly and tucked deep.
- Small ornaments. Fill in around the large ones, repeating shapes and colors.
- Fillers. Add picks, berries, or sprays to close any gaps.
- Topper. Choose one in proportion to the tree so it does not lean or overwhelm.
- Skirt. Finish the base so the tree looks grounded.
The American Christmas Tree Association’s October 2025 survey found that 83% of households planning a tree chose an artificial one. Most of us start with branches packed flat in a box, so the first step is not optional.

How do you fluff a Christmas tree so it looks full?
Disclaimer: This post contains affiliate links. To read more, check out our disclosure policy. As an Amazon Associate, I earn from qualifying purchases
Fluffing is actually one of my least favorite tasks in the Christmas tree decorating because I have sensitive skin, but using gloves really helps. It’s amazing how taking 15-20 minutes to separate the branches makes a HUGE difference.
The best way to fluff a Christmas tree is by working from the bottom to the top, separating every tip, and shaping the branches up and out. Fluffing is the step most people skip, and it does more for a full look than any extra ornament.
Start at the bottom and pull each tip apart so it fans out. Bend inner tips up and outer tips slightly down, then move up a section. Tuck floral picks into any gaps that remain.
How many lights do you need, and how do you put them on?
A common designer guideline is about 100 lights per foot of tree height, and you put them on by weaving them in and out of the branches. Wrapping lights around the outside leaves the inside dark and flat.
Use this table as a guideline and adjust for how bright you like it.
| Tree height | Light guideline |
|---|---|
| 6 feet | about 600 lights |
| 7.5 feet | about 750 lights |
| 9 feet | about 900 lights |
Work in sections from trunk to tips and back. Warm white reads cozy and traditional, while cool white feels crisper. Choose one and use it throughout.
Lights are also where safety matters most. The National Fire Protection Association found that electrical failures or malfunctions were a factor in 25% of home Christmas tree fires in its 2011 to 2015 data. Check every strand for frayed wires before you start.

How do you add ribbon or garland to a Christmas tree?
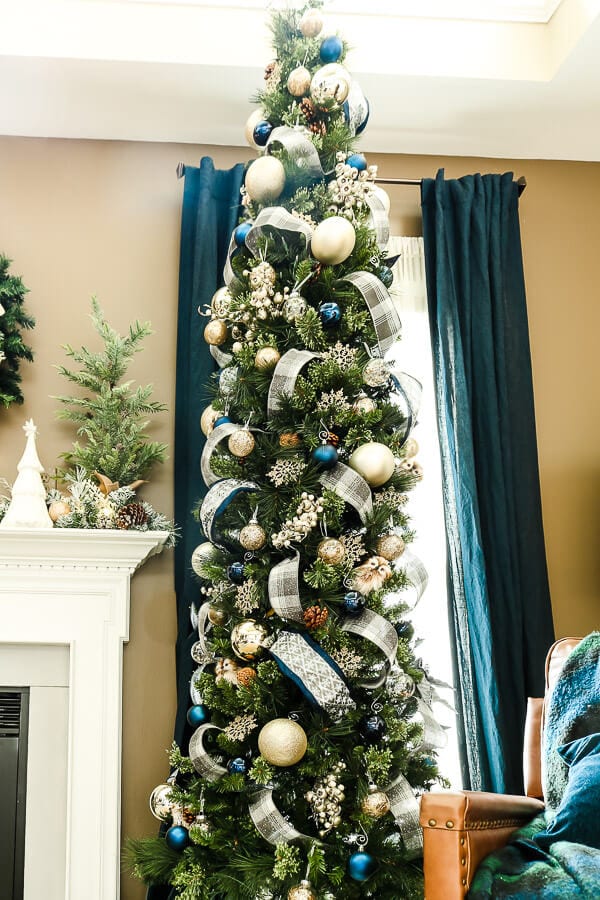
You add ribbon to a Christmas tree by choosing wired ribbon 2.5 to 4 inches wide and using one of three methods. Wired ribbon holds its shape and does not slide down the branches.
- Vertical cascade. Anchor the ribbon at the top and let it fall straight down, tucking it in every foot or so. It adds height on narrow trees.
- Diagonal wrap. Spiral the ribbon around the tree from the top, tucking as you go. It adds movement and hides sparse spots.
- Tucked loops. Tuck repeating loops into the branches for depth and texture on a fuller tree.
Garland follows the same rules. Drape it in loose swoops and secure it inside the branches so it does not sag. My full ribbon tutorial is in how to decorate a skinny Christmas tree with ribbon, and the same methods work on any size.
How do you place ornaments so the tree looks balanced?
You place ornaments so a tree looks balanced by hanging large ones first, repeating each ornament in a loose triangle, and mixing depths. Ornaments on the tips only make a tree look shallow, so hang some close to the trunk.
The triangle method: hang three of the same ornament in a triangle shape around the tree. Repeat the pattern with each ornament type. The eye follows the repeats, and the tree looks planned instead of scattered.
Put heavier ornaments on sturdier branches and lighter ones on the tips. Step back every few minutes to spot clumps or bare areas.
As a guideline, a 7.5-foot tree often holds somewhere around 75 to 100 ornaments, depending on size. Treat that as a starting point, not a rule.
How do you choose ornaments that make a tree look cohesive?
You choose cohesive ornaments by sticking to a palette of three colors, varying size and finish, repeating shapes, and adding one texture. Cohesion comes from repetition, not from a matching boxed set.
Use this short framework:
- Palette. Pick three colors and hold to them. My Christmas color schemes post has five ideas to start from.
- Finish. Mix matte, shiny, and glitter so the tree has depth.
- Shape. Repeat rounds, teardrops, or stars so the tree feels consistent.
- Texture. Add one unexpected material, like wood, velvet, or glass.
You do not need new ornaments. Sorting what you own by color usually reveals a palette you already have.
How can you make kids’ ornaments and sentimental pieces look cohesive?
It’s always a great idea to include the homemade ornaments. We love the reminders of years past and it really makes the tree come to life. The best way to make kids’ ornaments and sentimental pieces look cohesive is by giving them a memory zone, tying them together with ribbon in your palette, or moving the collection to a second small tree. The tree does not need to match to feel beautiful.
The memory zone is front and center at kid height, so the handmade pieces are easy to see and enjoy. Add ribbon in your palette to the same area, and the mismatched pieces read as a collection.
We also do more than one tree in our house, so I like to keep the living room tree fancy and the front room tree for all our sentimental ornaments.

What are the most common Christmas tree decorating mistakes?
The most common Christmas tree decorating mistakes are skipping the fluffing, putting lights only on the outside, hanging every ornament on the tips, using too many colors, ignoring a visible back, and choosing a topper out of proportion.
Safety belongs on this list too. The National Fire Protection Association reports that from 2016 to 2020 an average of 160 home structure fires per year began with a Christmas tree, and its 2017 report found those fires were 4.5 times more deadly than home fires that started with any other item. Keep the tree away from heat sources, water a live tree daily, and turn the lights off when you leave.
A 2020 ValuePenguin survey found that 20% of Americans had been injured while putting up a Christmas tree, so use a sturdy step stool and ask for a second pair of hands on the top.
Helpful Tools
- Christmas Prep Library … A collection of planning templates, decorating guides, and checklists to help you get the tree and the rest of the house ready without last-minute stress.
Frequently Asked Questions
As a guideline, plan for about 75 to 100 ornaments on a 7.5-foot tree, mixing large, small, and filler pieces.
Ribbon goes on before the ornaments. It sets the flow of the tree, and the ornaments fill in around it.
Warm white gives a cozy, traditional look, and cool white looks crisper and more modern.
Fluff every branch, weave lights inside, and add ribbon and a cohesive ornament palette.
Most trees take an evening. Set aside about two to three hours for a 7.5-foot tree, with fluffing and lights taking the longest.
Final Thoughts on Decorating a Christmas Tree
A tree does not have to look like a magazine cover to feel like yours. Most of the difference comes from the order you work in, and you can do it in one evening with the ornaments you already own. Progress beats perfection, and the tree you finish will always be better than the one you keep planning. If you want a simple plan for the rest of the season, grab my free printable Christmas checklist.
About the Author

Christin Cieslarski is the founder of My Homier Home and the creator of the Confident Decorating® method. She helps busy women go from stuck and second-guessing to calm, confident, and actually making progress on their homes… one steady step at a time.
Last Updated:
More Decorating Help
If you enjoyed this post, make sure to pin the image below for reference later!