7 Steps to Creating Your Perfect Gallery Wall
Don't know where to start to create your perfect gallery wall? Follow my 7 simple steps to create the best gallery wall for your home.
Looking to create a gallery wall in your home?
First comes the idea, then comes the questions…
How how many items should I include? What should those items be? All pictures frames or something else? How much of the wall it should cover? How should I lay it out? Where do I even begin?!
You're in luck… I've got all the answers in today's post!
Table of contents
- 1. Determine the usable space you will need to create your gallery wall.
- Vocabulary
- A. Measure the total space you have to work with ( Video – 0:47 Minutes)
- B. Change measurements to inches ( Video – 1:31 Minutes)
- C. Transfer your total space measurements to graph paper ( Video – 2:23 minutes)
- D. FInd the center of your total space ( Video – 3:04 Minutes)
- E. Find half of your usable space ( Video – 3:55 Minutes)
- F. Transfer your usable space measurements to graph paper ( Video – 5:22 Minutes)
- 2. Determine which items you want to display in your gallery wall ( Video – 8:27 Minutes)
- 3. Decide on a general pattern for your gallery ( Video – 8:51 Minutes)
- 4. Enlarge your usable space ( Video – 10:43 Minutes)
- 5. Determine the dimensions for your gallery items ( Video – 13:14 Minutes)
- 6. Create a color plan ( Video – 17:05 Minutes)
- 7. Make a to-do list ( Video – 19:03 Minutes)
When I first had the idea to create a gallery wall on my entryway staircase, these were some of the questions I wrestled with.
The good news is I figured out exactly how to create the perfect gallery wall without all the trial and error and I'm so excited to share it with you!
I created an enormous gallery wall that is perfectly level, spaced and sized for my wall in a single weekend!
My start to finish process is below with all the details, but I highly recommend grabbing the printable below to simplify this process even more for your gallery wall.
Be sure to also check out part 2, how to hang the perfect gallery wall, too!
Disclaimer: This post does include affiliate links for your convenience. This is at NO additional cost to you but earns me a small commission. To read more, check out our disclosure policy. As an
1. Determine the usable space you will need to create your gallery wall.
Repeat after me, “I WANT TO GET IT RIGHT THE FIRST TIME.”
In order to do this, you will need to do some, dare I say, calculations.
Now being a high school math teacher by trade, I am going to take you down a path that will ensure you get it right, but keep in mind it does involve some number manipulation.
However, I want you to take a deep breath and refrain from freaking out, okay?
Don't go around the house talking to the pillows about how you were never good at math and who is this homier home lady anyway… I promise, if you follow this step-by-step, you will get it right the first time… Guaranteed!
And just to make it that much easier, I recorded a little teaching session below where I walk you through each of these steps one by one.
Now remember the reason we are doing all these calculations… before you decide what to put in your gallery wall design, you need to know how much room you have to work with.
Once you have this part complete, the rest will be an artistic breeze.
So, grab a basic calculator, measuring tape, straight edge/ruler, a pencil (no pens in math lol), and the printable workbook.
Take a few deep breaths and let's get to it!
Vocabulary
First things first, as any good teacher would, I'm going to give you some vocabulary words below to refer back to as I continue through this process.
This will make sure you know what I'm talking about when I use these phrases.
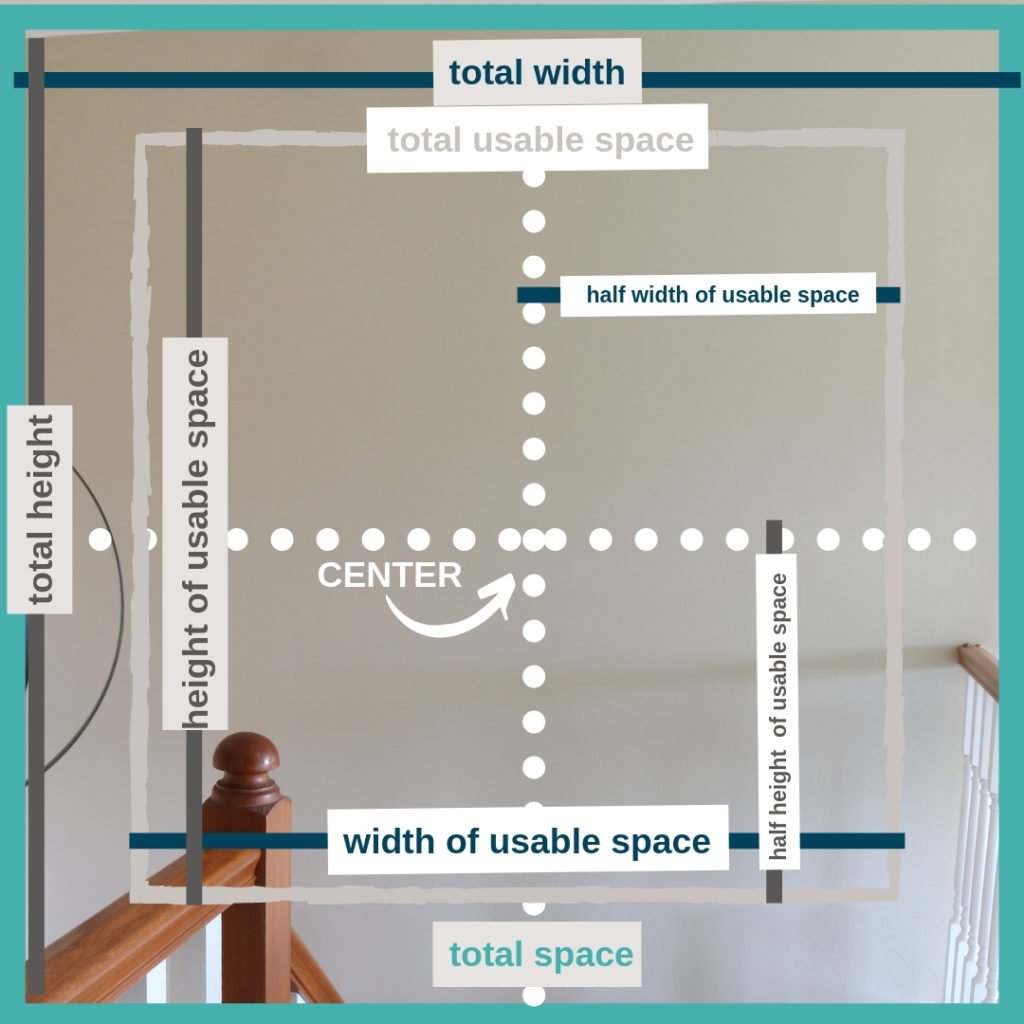
- Total Space: The length and width of the full space (i.e. 8’11” x 8’8”)
- Total Width: Just the width of the total space (i.e. 8’8”)
- Total Width in Inches: I also refer to this in part b and beyond in inches (i.e. 104″)
- Total Height: Just the height of the total space (i.e. 8’11”)
- Total Height in Inches: I also refer to this in part b and beyond in inches (i.e. 107″)
- Total Height in Inches: I also refer to this in part b and beyond in inches (i.e. 107″)
- Center: the middle of the total space
- Total Usable Space: the length and width of 2/3rds of the total space
- Width of Usable Space: 2/3rds of the total width
- Height of Usable Space: 2/3rds of the total height
- Half Width of Usable Space: 1/2 times the width of usable space
- Half Height of Usable Space: 1/2 times the height of usable space
A. Measure the total space you have to work with (Video – 0:47 Minutes)
Using a measuring tape, measure the height and width of the full wall (total space) where your gallery wall will go.
You can see in the picture above, mine was 8’11” (8 feet and 11 inches high) by 8’8″ (8 feet and 8 inches wide).
B. Change measurements to inches (Video – 1:31 Minutes)
Keep in mind, all of these calculations are fill-in-the-blank and color-coded on the printable workbook. This post is the detailed description.
There are 12 inches (12″) in 1 foot (1′).
So, take the total width in feet and multiple by 12 and then add the leftover inches (i.e. 8 X 12 = 96, then 96 + 11 = 107 inches).
Repeat the same process to change the total heigh into inches (i.e. 8 X 12 = 96, then 96 + 8 = 104 inches).
Record your total width and total height in inches on your printable workbook.
C. Transfer your total space measurements to graph paper (Video – 2:23 minutes)
On the first graph paper section of the printable, you will sketch the total space of the wall using the measurements you found.
This will be to scale… meaning each square on the graph paper will represent 12 inches.
When you get to a measurement that only covers part of a box (i.e the additional 8 inches on my width measurement or additional 11 inches on my heigh measurement), don't feel like you have to be super exact.
Mentally cut the box into sections and guestimate what 8 inches or 11 inches may look like. You will have a rectangle when you are done which will represent your total wall space.
D. FInd the center of your total space (Video – 3:04 Minutes)
Using the guide in the printable, multiply your total width in inches by 0.5 (i.e. 104 x 0.5 = 52 inches).
Record it in the printable.
Then, multiply your total height in inches by 0.5 (i.e. 107 x 0.5 = 53.5 inches).
Record this number in the printable. Count the number of boxes and mark center on the graph paper section.
E. Find half of your usable space (Video – 3:55 Minutes)
In case you forgot, the reason we are doing all these calculations… it's to figure out how much usable space we have to work within for our gallery wall.
I'm going to talk about two-thirds (2/3rds) of the space a lot in this section.
You may wonder, “Why did I choose 2/3rds?”
One of my favorite interior designers once told me your wall art should take up about 2/3rds of the space and be about the same shape of that space.
If your art is too small, it may look off to you and the same goes for anything bigger… hence the 2/3rds business ahead.
* Pause *
If you've been keeping up with me so far, give yourself a pat on the back!
This is the last section to completing step one and I promise the rest is super simple.
Now, you might be able to tell that I'm treating you as if you are not a math person solely based on the number of times people have told me such things.
So, if you thought this was a breeze, than you're an all-star. If you've been taking my advice and taking many deep breathes through this process to not run screaming, you're still an all-star because you made it this far!
This is the last of the math, so hang in there (unless you count the actual hanging of the gallery wall, but we'll get to that later).
* Resume *
First, multiple your total width (i.e. 104″) by 2 and then divide that number by 3 in your calculator.
This will give you the width of your usable space (i.e. 69.3″) which will be used again in step 4.
Then, divide that number by 2 (i.e. 34.7″).
This is half the width of your usable space. Record these numbers in the printable.
Second, repeat the same steps for your total height.
Multiply your total height (i.e. 107″) by 2, then divide that number by 3 in your calculator.
This will give you the height of your usable space (i.e. 71.3″) which will be used again in step 4.
Then, divide that number by 2 (i.e. 35.7″).
This will be half the height of your usable space. Record these numbers in the printable.
F. Transfer your usable space measurements to graph paper (Video – 5:22 Minutes)
On the same graph paper section of the printable you used for the total space, you will sketch, using a dashed line, the total usable space of the wall using the measurements you found.
This is the area that will house your gallery wall items.
In order to determine where to mark your usable space on your graph paper, you will want to take the center measurements you found in part d and record them again in your printable.
Starting with the center measurement for the width, subtract the number you found in part e (half the width of the usable space) from the center of the width measurement (i.e. 52″ – 34.7″ = 17.3″).
Then, also add the number you found in part e (half the width of the usable space) from the center of the width measurement (i.e. 52″ + 34.7″ = 86.7″).
Repeat the same steps for marking determining where to mark the height measurements of your usable space.
This will entail taking the center measurement for the height and subtracting the number you found in part e (half of the height of the usable space) from the center of the height measurement (i.e. 53.5″ – 35.7″ = 17.8″) and then also adding the number from part e to the number in part d (i.e. 53.5″ + 35.7″ = 89.2″).
These four measurements will tell you exactly where to place a dot on either side of center to see your usable space.
If this part was confusing, be sure to not only download the printable, but also watch the video below where I walk you through this whole step one process using the printable workbook.
It's much easier with the printable and video.
2. Determine which items you want to display in your gallery wall (Video – 8:27 Minutes)
Alright, enough math for a little bit – now for the fun part!
The next thing you want to do is decide what types of items you want to display in your gallery.
When you are thinking about this, consider what your goal is for this gallery. Is it to display your family and friends, your immediate family, specifically your kids, your story?
When you or anyone else passes it, what do you want them to see, feel, or takeaway from this gallery? Remember, this is your opportunity to tell a story through your wall art.
For me, I wanted my gallery wall to tell the story of our life together along with the things I want to remember every day.
My gallery wall featured in this post is the first thing you see when you walk in the front door and when you walk out of our master bedroom, so it was important to me to tell the story of us and remind myself of all the greatness we have or have had in our lives.
I chose the following items to be included in my gallery wall in this initial step:
- A picture from our wedding (non-stuffy)
- Lyrics to our wedding song
- My favorite prayer – Angel of God
- Lyrics from Wonderwall by Oasis – This is the song that my husband played for me when we were 14 over the phone before we ever met. He brought me the CD at school the next day and I kept it until we finally dated senior year of high school.
- A picture of my sweet little fur baby, Lambeau
- 5 or so additional pictures to give me some room for flexibility when we have kids. For now, I chose family and friends to display in memorable moments.
With this idea of what I wanted to include, I was able to gain a little direction on how to complete the rest of the steps below.
3. Decide on a general pattern for your gallery (Video – 8:51 Minutes)
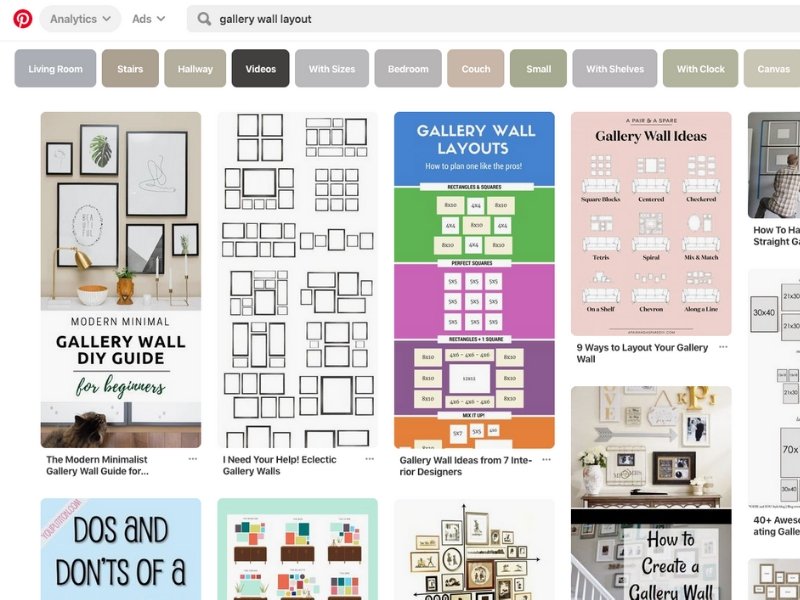
If you search gallery wall layouts on Pinterest, you will find some amazing graphics that give you some idea as to how to map out the pattern of your gallery items.
Once you've used these as a guide and have narrowed it down, ask yourself if these options feel right. Does a particular layout help you reach your goal for this gallery?
If you're thinking to yourself the ole' ya kinda, then consider making up your own.
I used the ideas I found to guide me, but I found it much more freeing to create one myself.
I wanted the focal piece to be our wedding photo in the center.
Then, I knew I wanted the wedding song lyrics and Angel of God prayer to offset each other and be a similar design. I also wanted to be sure to incorporate a frame I made two years ago to surround the center wedding photo.
The next thing I had to consider is how prominent I wanted the Wonderwall lyrics. The rest was filling in the pieces.
In this step, remember that you are just mapping a rough sketch of your general idea for what you think will look aesthetically pleasing.
In addition to drawing a rough sketch, consider what kind of “theme” you want for the layout. I use the word theme loosely, but here are some ideas to kickstart your thoughts:
- Everything in line vs. Symmetrical vs. Asymmetrical vs. Balanced
- Black and White vs. Color Photos and/or Frames
- Square/Rectangle frames vs. Mix and Match of Shapes
- All Frames vs. Some Frames with Eclectic Items
Don't feel like you have to pick one of these only or even just these options. Think about your style and how you want the gallery wall to feel when it is on the wall.
For my gallery wall, I chose color-balanced frames with mostly black and white photos and a mix-and-match of shapes. This gave me the aesthetic I wanted for this giant entryway artwork wall.
4. Enlarge your usable space (Video – 10:43 Minutes)
On the second piece of graph paper in the printable workbook, sketch a larger version of your usable space.
In the workbook, each box for this second piece of graph paper is now 4 inches (i.e. 3 boxes = 12 inches).
Count the number of boxes you need based on your width of usable space (left to right) and height of usable space (up to down).
You should have the same rectangle as you made in the previous graph paper section, but now you are looking at only the usable space in a larger format.
The purpose of this is to help you see the detail and get a may accurate reading on what will fit in your usable space because the next step is to figure out what size items you need to make/purchase/use for your gallery.
5. Determine the dimensions for your gallery items (Video – 13:14 Minutes)
Before beginning, take some time to do a little research.
In order to make sure I was able to purchase or make my items, I double checked the standard sizes for frames and prints as well as the typical sizes for artwork from my favorite Etsy shops that I planned to use for this wall.
Also, be sure to measure anything you already have and plan to use, so you can be sure to fit those items in at the start of this process.
For instance, I wanted to use a frame I made which was 31” x 24”. This is kind of an awkward size for a frame, so I had to do some research on print sizes to determine what I could fit within it.
This step is all about trial and error, so using a pencil versus a pen is a must in my opinion. Within the enlarged usable space you sketched, begin mapping items you already have, if any.
Be sure to draw them to scale, meaning if my width is 31″ it will take up a little over 7 boxes on my drawing and 6 boxes for the height of 24″. During this process, you should use your inspiration pictures to help map out the pattern you want from step 3.
Since I wanted my wedding picture in the center, I measured the frame (31”x24”) and spaced it directly in the center of the usable space to scale using my graph paper boxes.
If you don’t have any items already, you have more freedom to be creative, but be sure to start with the main items or the biggest items.
While working through this consider what your focal point should be and what kind of “order” you want the story to be told.
I wanted our wedding photo as the focal point and the whole wall to have a meaningful title of sorts, which is how I ended up with the Wonderwall quote at the top of the gallery, but also because it was the start of our lives together.
Don’t forget to account for 2” or 3” between items unless you want them touching.
Also, consider the number of items you wanted in the gallery from step 2.
For me, I wanted about 10 total items on my gallery wall, so I used my research of typical sizes of frames and specialty items to fit my pieces in like a puzzle.
Remember to allow your creativity to shine in this step.
When I reached a place where I had room but didn’t want any more rectangular frames, I brainstormed ways to bring in some circular eclectic items, too.
6. Create a color plan (Video – 17:05 Minutes)
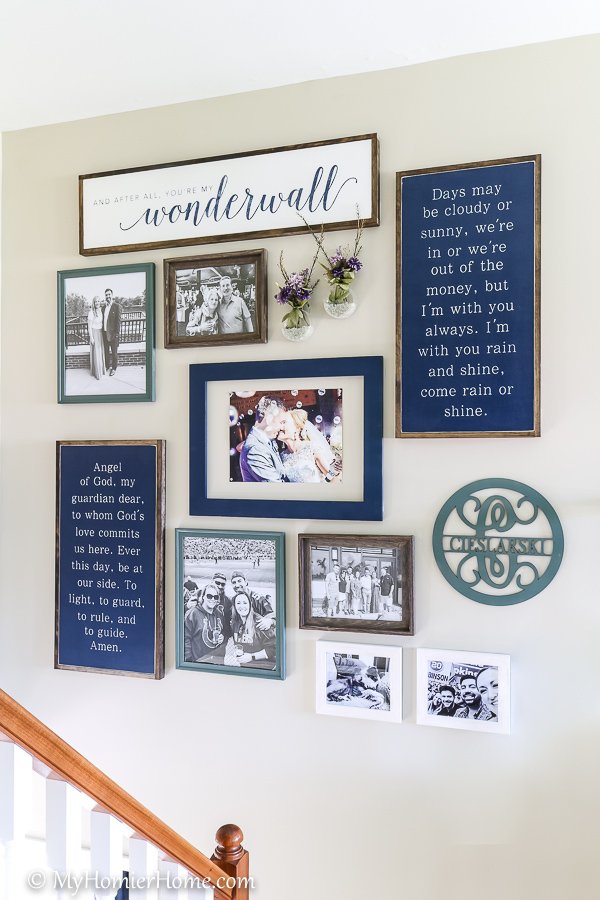
Creating a color plan is important to make sure your gallery wall gives you the aesthetically pleasing feeling every time you look at it.
If you are using black and white for everything or the same colored frames, than this won’t apply to you as much, but it is definitely worth mapping a color plan if there is any type of color involved in your gallery wall.
As you can see from my gallery wall picture above, my color choices were very intentional.
Before deciding which items should have what color scheme, I first wrote a list of colors and textures I wanted to incorporate.
I decided I wanted the colors to be navy, deep green, and white with wood frames mixed in and black and white photos for all framed photos except for the wedding photo in the center.
Once I had an idea of the types of colors/textures I was working with, I used my colored pencils to shade in the color I wanted the items to be.
Keep in mind, it is best to use the triangle method to disperse color.
The triangle method suggests having at three items (or an odd number) of the same color and to balance them in the shape of a triangle (any triangle).
7. Make a to-do list (Video – 19:03 Minutes)
Once you feel good about your layout and color plan, it is time to make a list of what you need to do, including what to purchase, what to DIY, and what to order.
Because you mapped everything out to scale in step 5, you will have the dimensions you need already to go. My list went something like this:
- Purchase 2- 18″x36″ navy signs with white writing and a dark wood frame from The Shed for the Angel of God Prayer and wedding song lyrics.
- Purchase a 48″x12″ white sign with navy writing and a dark wood frame from The Shed for the Wonderwall quote.
- Purchase 2- 11″x14″ dark wood frames
- Purchase 2- 16″x20″ paintable frames
- Purchase current mood paint
- Paint 16″x20″ frames with current mood
- Purchase 2- 4″ round glass planters
- Purchase quart size Sherwin Williams naval paint
- Paint my 31″24″ frame
- Purchase a 20″x26″ enlargement of our wedding photo for inside the frame
- Purchase 2- 8″x10″ white wood frames
- Purchase last name sign from Etsy
- Paint last name sign with current mood paint
- Choose 6 black and white photos to print for frames
- Purchase black and white prints
- Purchase hanging supplies
- Hang the gallery wall (post tutorial and video found here for how to hang it)
What now?
Now that you have this amazing plan, you might be asking yourself, what's next?
Well first, give yourself a pat on the back for completing these planning stages. You did the hard work, so now you get to work your to-do list and get ready to hang your gallery wall.
If you worked this planning session as I taught it, you will not need to second guess yourself at all.
I tried to second guess myself right before we hung the gallery wall, but it was just a waste of time because I ended up going right back to my original plan I created using these steps.
Once you've completed your to-do list and you're ready to hang your gallery wall, we will be ready too!
Be sure to tag me on instagram @myhomierhome and show us your project and drop a comment below if you have any questions.



This was the most complicated, hard to follow “ how to” I think I have ever seen for a diy anything …let alone a gallery wall .
Aww thanks so much Leigh. Luckily there are plenty more on the internet you can follow, but I guarantee this one will make sure it looks like it’s supposed to. Good luck and have a great day!