
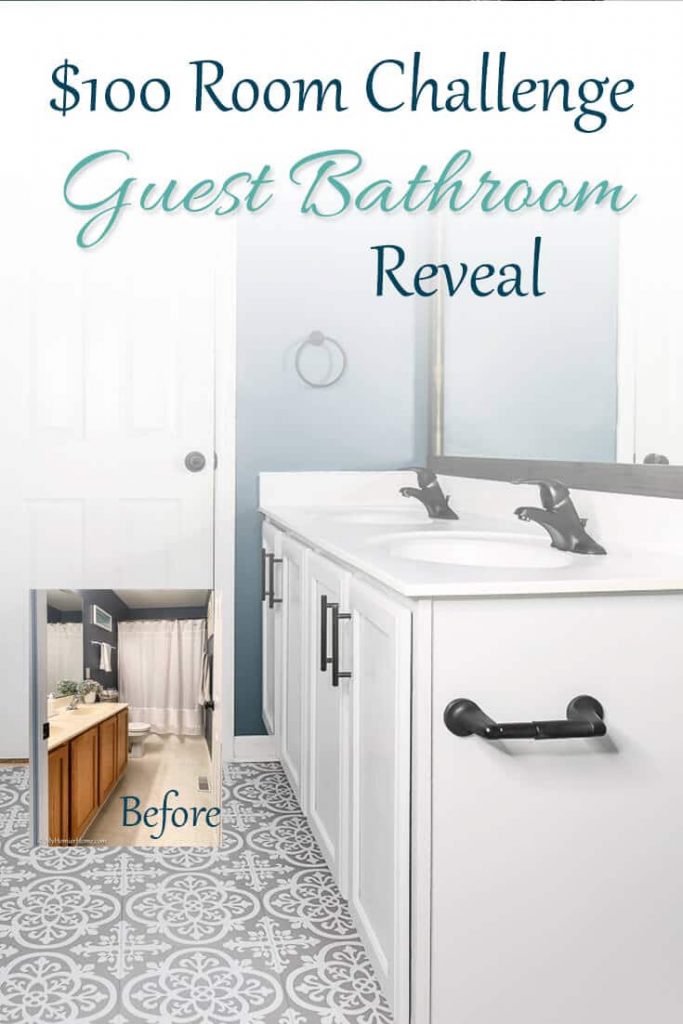
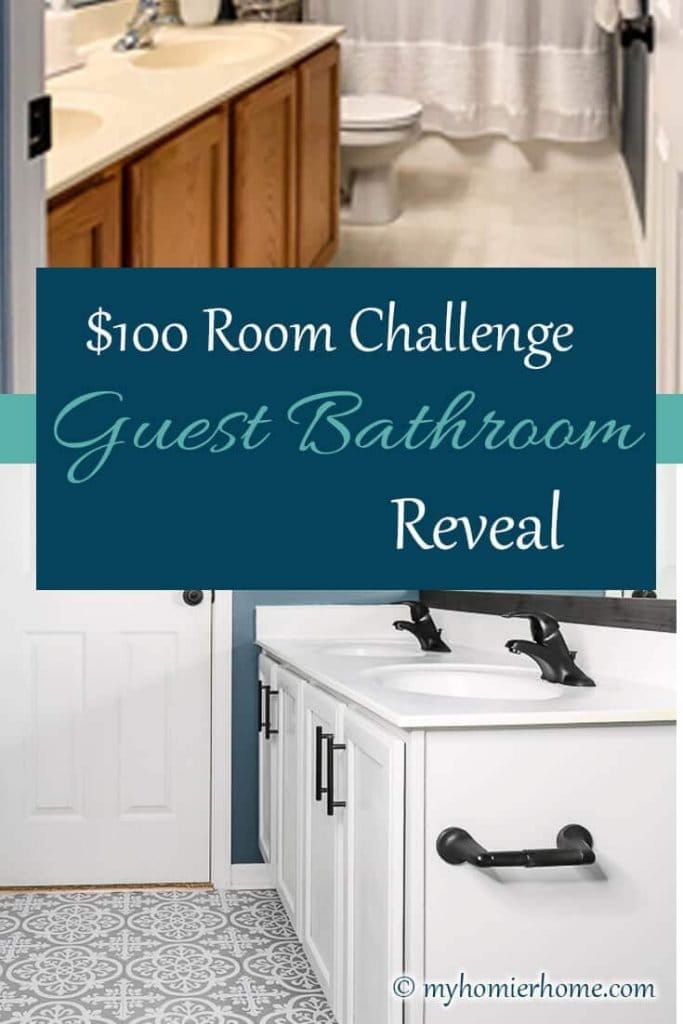
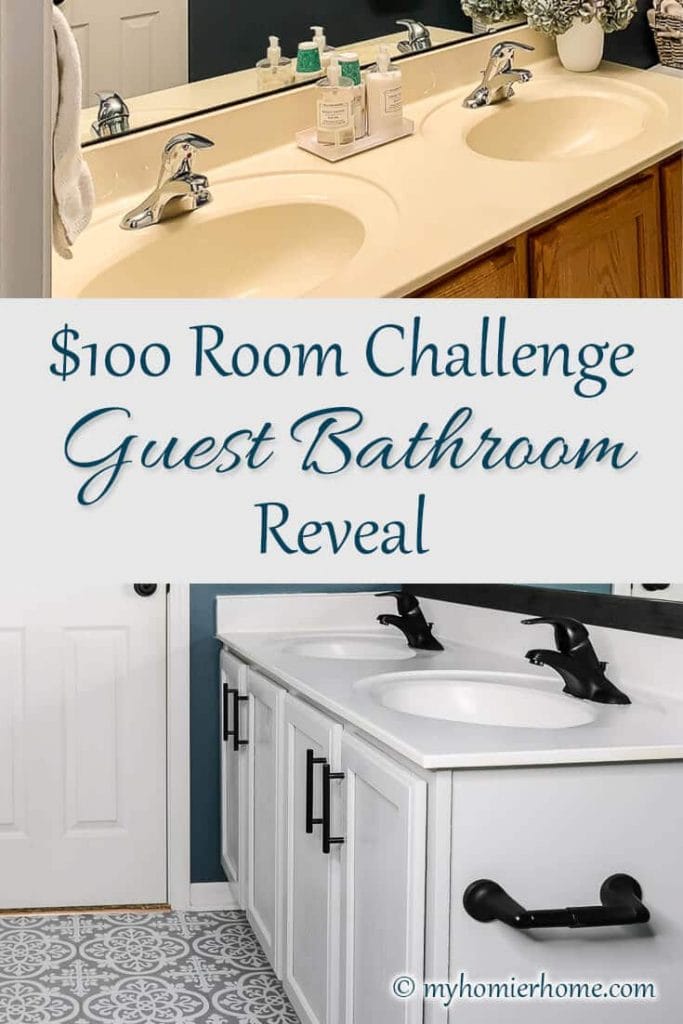
Blue, Gray, & White $100 Guest Bathroom Reveal
Transforming a builder-grade bathroom on a $100 budget can be done!
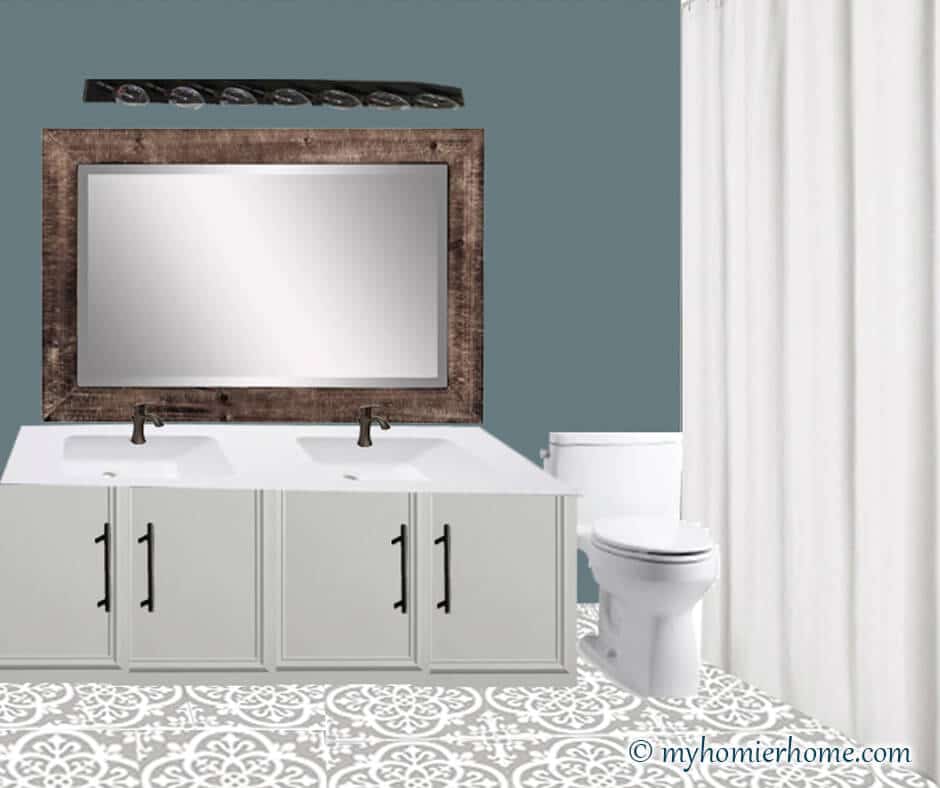
Week 1 (Mood Board)
Week 2 (Spray Painted Counter)
Week 3 (Spray Painted Faucets)
Week 4 (Spray Vanity with a Paint Sprayer)
Week 5 (Final Reveal)
The day has finally come! My $100 room challenge guest bathroom revealed! I am so excited to show you this reveal I can't even stand it!
Table of contents
Disclaimer: This post contains affiliate links. To read more, check out our disclosure policy. As an Amazon Associate, I earn from qualifying purchases
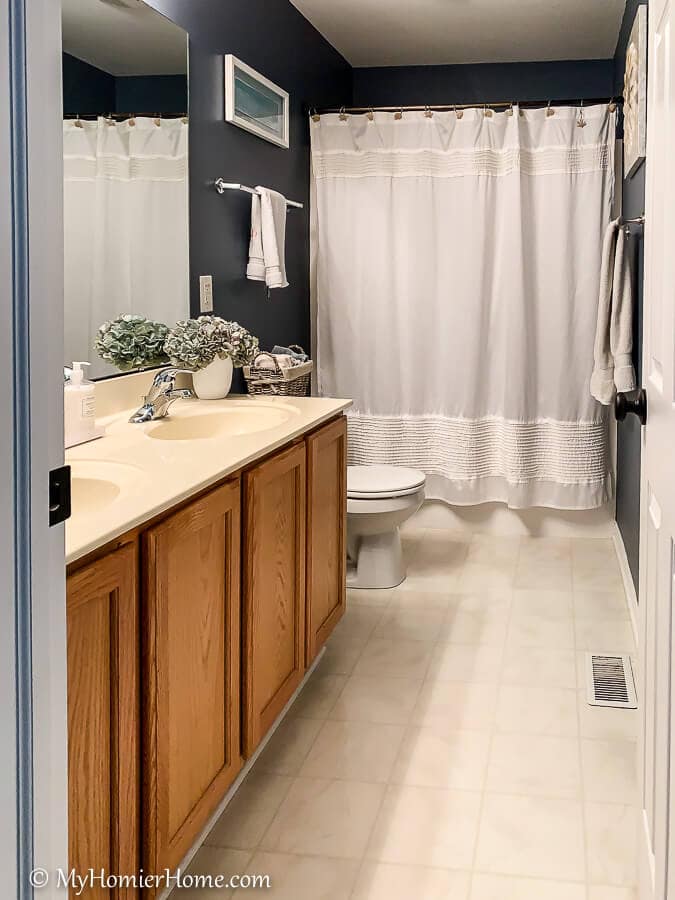
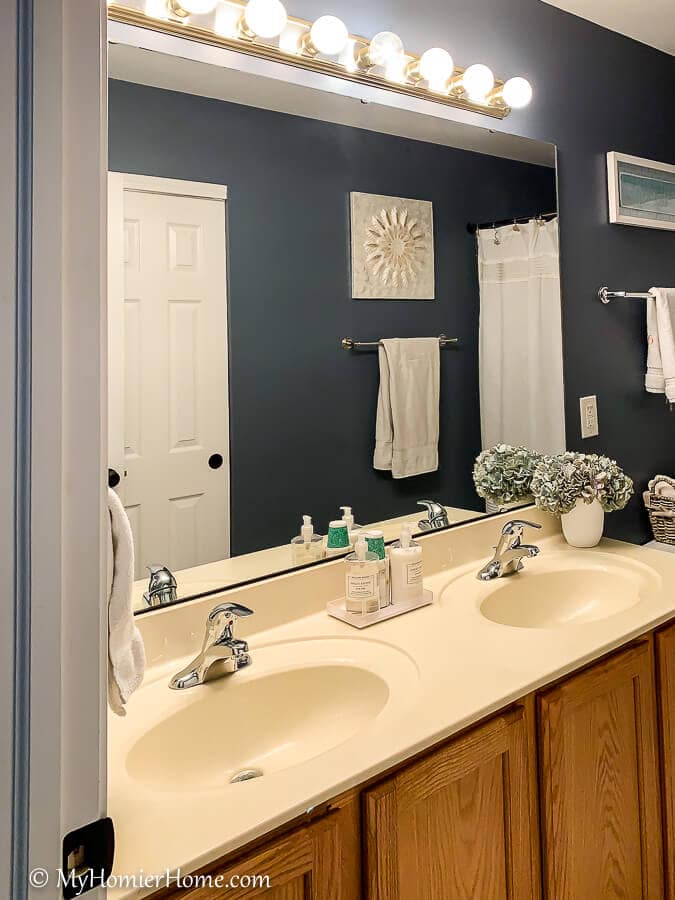
Before Photo
To remind you where I started, here are the before shots of the guest bathroom…
The Plan

Here's what I set out to do 4 weeks ago all for under $100…
- Paint the vanity
- Paint the countertop white
- Paint the faucets oil-rubbed bronze
- Paint the bathroom towel hangers oil-rubbed bronze
- Build and hang the mirror frame
- Spray paint the vanity light with oil-rubbed bronze spray paint
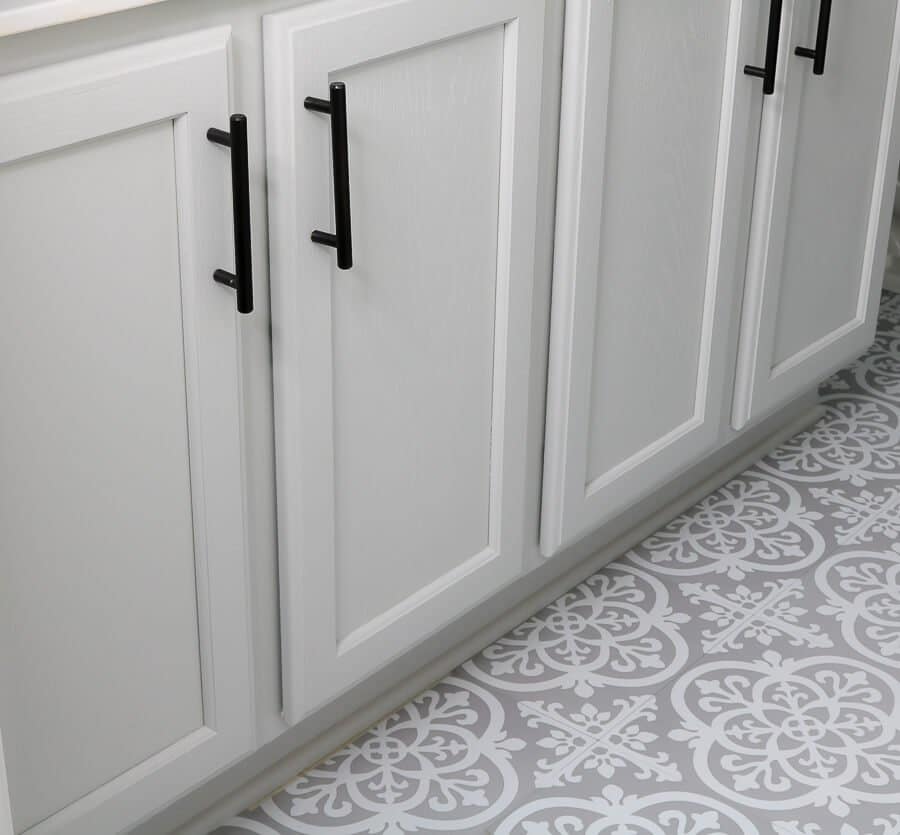
- Add pulls to the cabinets
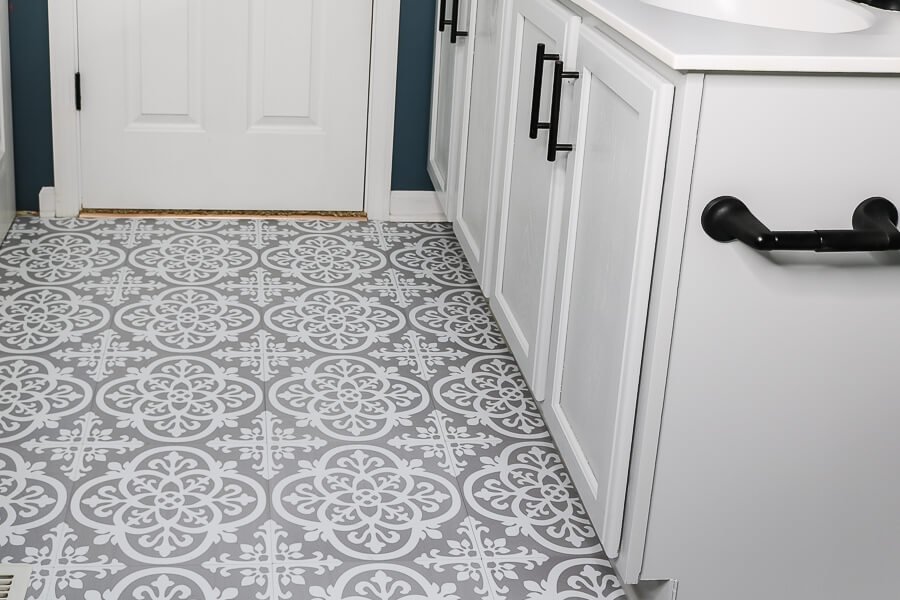
- Changing the flooring to a fun pattern
- Decorate/Hang a shelf
Seems like a long list, but with some DIY and salvaging, I did it!
After Photos
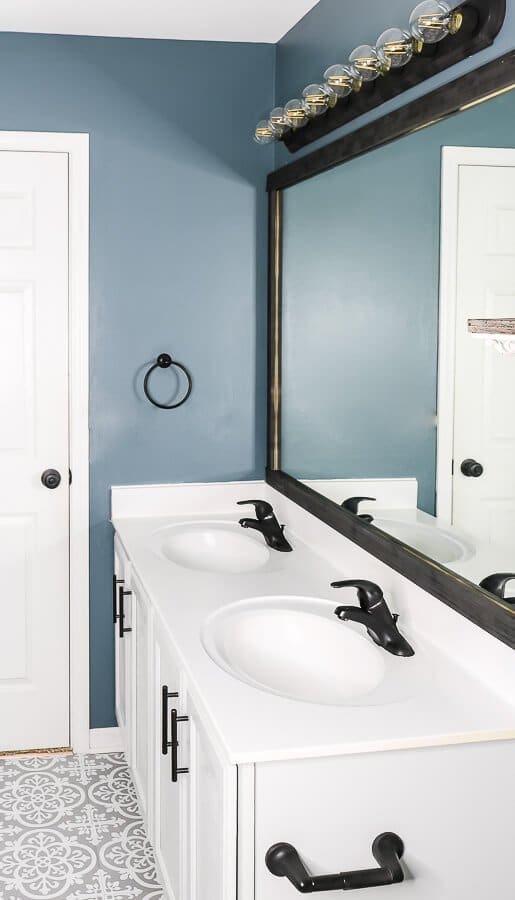
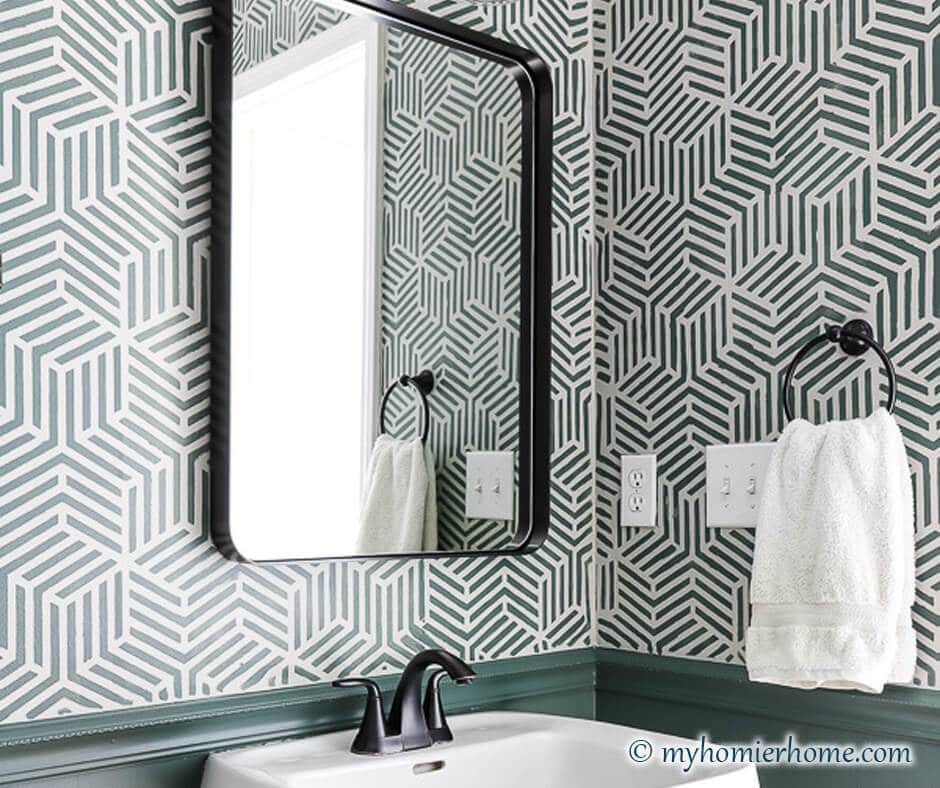
Before I get to the cost breakdown, here's what the guest bathroom on a budget looks like now!
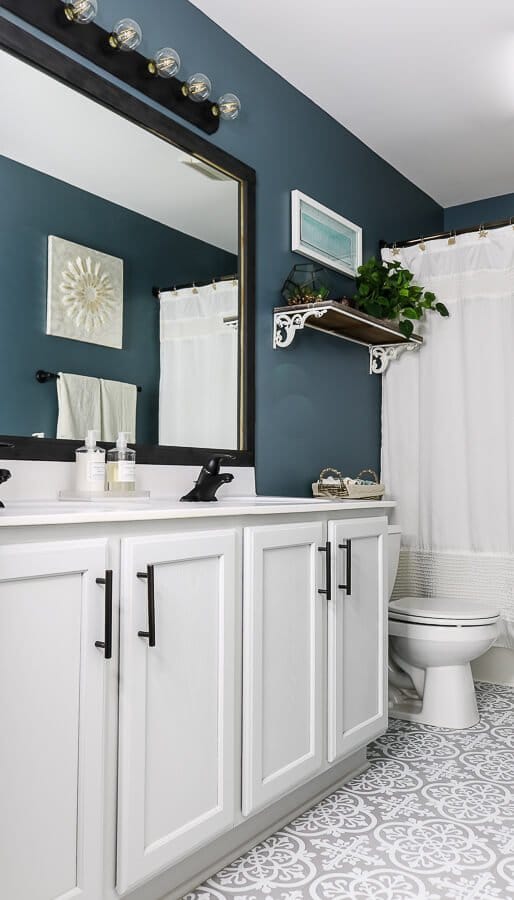
I still have a bit of work to do in decorating, but I'm gonna save my cash until I find the right pieces. I'm thinking some kind of hanging terrarium type feel under the shelf to fill the gap.

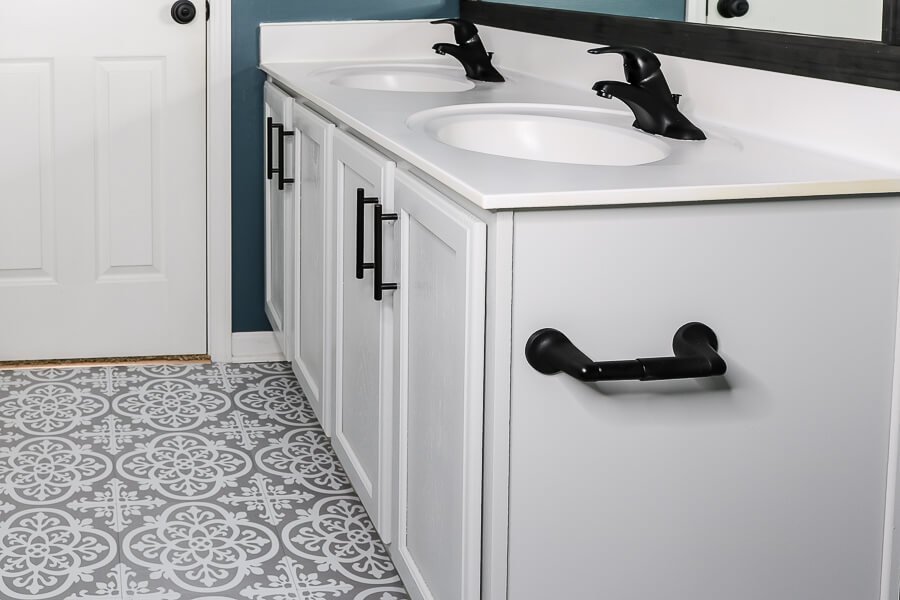
Painted Vanity, Added Pulls, Spray Painted Countertop & Faucet, Laid Peel & Stick Flooring
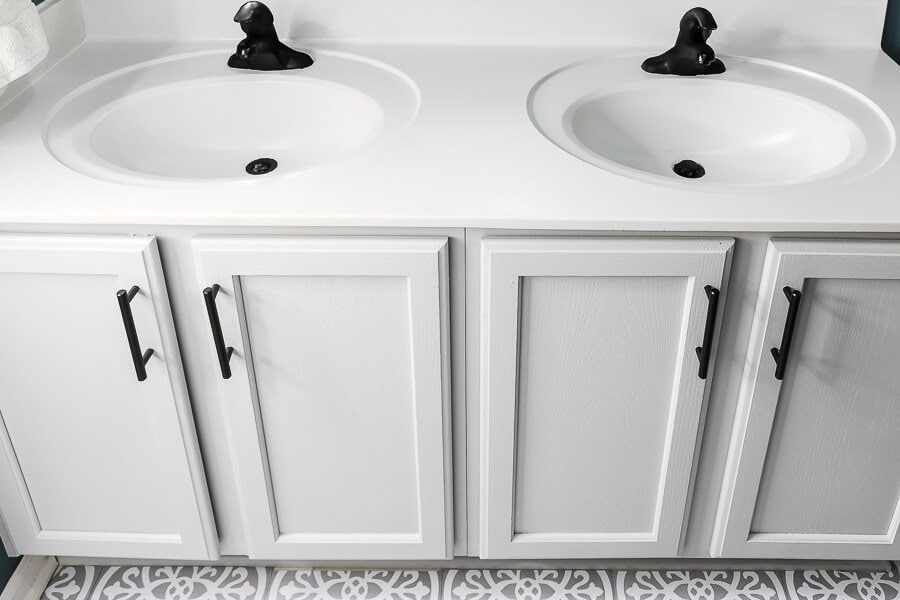
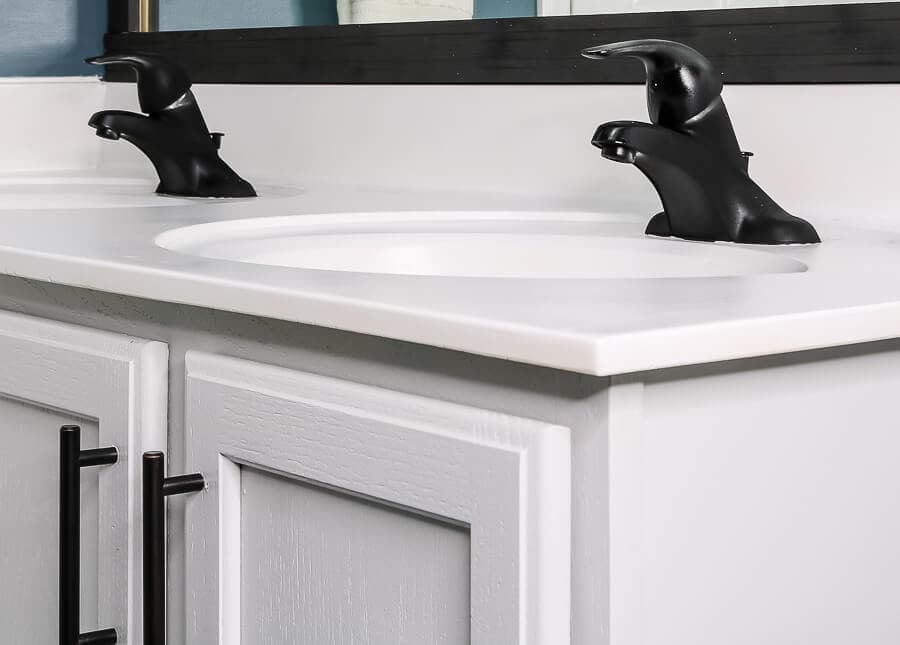
You can see in my close up of the spray painted faucets that my taping wasn't the best and I missed some spots under the handle.
However, as they do in Indian art, including a flaw in your work makes it personalized. And I kind of like the silver remnants peaking out.
But that floor!!! I still can't get enough!
I want to finish caulking some areas, but it was time to pick up little missy from daycare, so that'll have to wait.
I used the best tool for attaching pulls.
I loved this cabinet jig to attach the pulls. It mad each one exactly the same which is fantastic.
Spray Painted the Towel Holder Accessories, the Vanity Light, and the Wood Surround
Spray painting the vanity light and building the wood surround was probably the easiest part of the whole project.
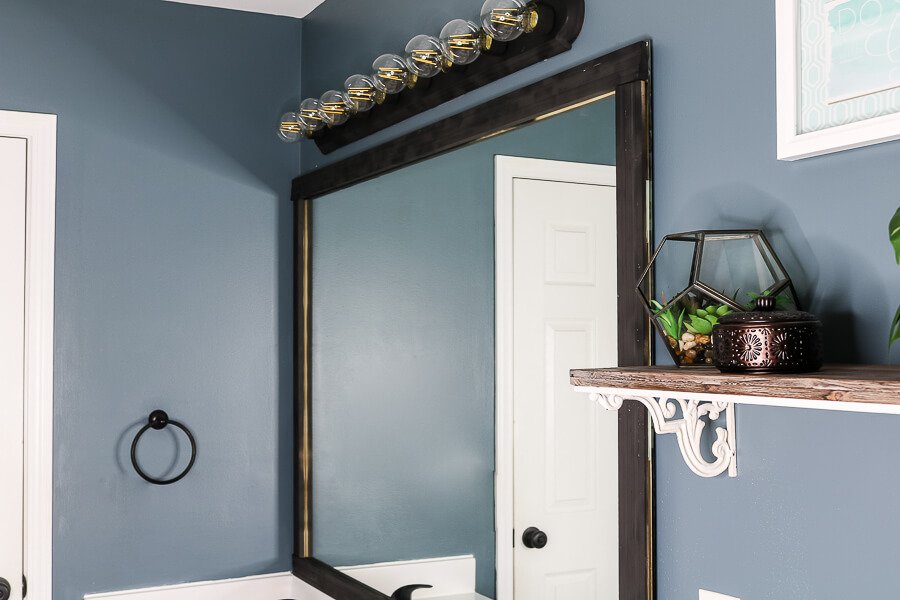
The wood surround is actually leftover trim that went around our door casing. I spray painted it using the automotive primer and attached it with 3M picture frame velcro strips.
I actually had the grooved part facing the mirror and the flat part facing out initially for aesthetics.
Lucky for me, it actually worked great that way because I was able to put the velcro strips in the inset part to make it more flush.
I would recommend spray painting all sides if you plan to do this, but I ran out of spray paint, so I'm considering the part you can see reflecting in the mirror as accent lol.

Last but not least, I added a shelf to this space and plan to add more underneath the shelf since there is a big gap, but I repurposed some decor and this shelf that has been kicking around for awhile.
Cost Breakdown
The moment you've been waiting for… How did I actually do this on a $100 budget? Below I will show you how my budget broke down, but also how much it would cost if you did this without these materials on hand because it is still so cost effective no matter which way you look at it! Here we go…
- $27 to paint the vanity
- $27 – Since I only used not even a fourth of my gallon of paint, I'm going to count this as half the price of what I purchased
- If you were doing this project, you could get a quart size can of paint at Home Depot for $27 and that would work too
- $27 – Since I only used not even a fourth of my gallon of paint, I'm going to count this as half the price of what I purchased
- $0 to paint the countertop white
- $0 White Appliance Epoxy Spray Paint (Found some at my mom's from a previous project… jackpot!)
- If you had to buy, it would cost you $5
- $0 White Appliance Epoxy Spray Paint (Found some at my mom's from a previous project… jackpot!)
- $11 to paint the faucets
- $11 – 2 cans of Automotive Spray Paint in Dark Gray
- $0 – 1 can of Lacquer top coat (I already had these items)
- $0 – Frogtape + Brown paper (I already had these items)
- $0 to paint the bathroom towel hangers
- $0 – Used the same 2 cans of automotive spray paint above and lacquer top coat
- $0 to build and hang the mirror frame
- $0 – Used leftover trim and automotive spray paint listed above
- $0 to spray paint the vanity light with oil-rubbed bronze spray paint
- $0 – Used the same 2 cans of automotive spray paint listed above
- $0 to add pulls to the cabinets
- $0 – Used leftover pulls from kitchen
- You can find these at a wide range of prices, some as little as $3/pull
- $0 – Used leftover pulls from kitchen
- $60 to change the flooring to a fun pattern
- $60 – 4 boxes of peel and stick flooring
- $0 to decorate/hang a shelf
- $0 – Repurposed decor and a shelf I had in the basement
For a grand total of $98!!
You can purchase any of the items I used to complete this guest bathroom makeover on budget by clicking any of the pictures below.
Don't forget to check out all the $100 room challenge reveals below! There are some amazing projects!!


Christin it looked real pretty before but WOW the after really jazzed it up. I love the white cabinets against the dark wall. Your floor is so pretty to. Everything looks well together. Love it!
It turned out so amazing!! Great job!!
Thank you!! I’m excited to see everyone else’s too!
What a great makeover. I really love the floor, and the dark blue is gorgeous.
Thanks! I can’t believe how cheap the floor was!
This is stunning! You did a fabulous job! I love it!!
Thank you!! Feels good to be done and have it work as planned lol
Wow! That floor is amazing! I love the whole bathroom but the floor just makes such a difference. Great job!
It really does!! Thank you!
Love the way it all turned out, love the flooring, it makes the bathroom pop.
Thank you!! The floor is definitely my favorite too!
You bathroom looks so clean and updated. I love it! Beautiful job.
Thank you! Feels so good to have this room done!
The floors and cabinet upgrade have really elevated you bathroom, GREAT JOB! This is such a lovely reveal!
Thank you! It really needed it too! Lol
What is the wall color?? Dying to use something similar in my bathroom!
It’s called Charlotte Slate by Benjamin Moore! I think it also has a secondary name, but if you google Charlotte Slate it’ll come up 🙂
You did an amazing, inspiring job, Christin. I love the color blue you chose. It’s just amazing what you did with $100!! I need to do something similar, but will need to purchase a counter top, so there goes the budget!! Congratulations on a fabulous bathroom!
Thank you!!
It is amazing what you accomplished in this space. It looks great!
Thank you!! Took some elbow grease, but definitely glad I did it.
It turned out so pretty!! I’m loving the floor!
Oh yes! The floor is my fav too!
Loved it! I liked how you formatted this too!
Great job!
Thanks!!
I’m pretty sure I have the same exact bathroom! It needs a makeover desperately! This gives me hope!
What a difference! I love everything you did! The frame around the mirror was a great idea.
Thanks!! I saw that while perusing Pinterest and it really makes a huge difference!
I love how this turned out! and for only $100!
I know, right? I was nervous I was going to go way over, but it can be done!
I never would had guessed spray paint and trimming out the bathroom mirror was all you did!!! Besides the floor, that was oblivious. But I had to scroll back to the top to compare. LOVE the new finishes. This is quite a doable idea for people whose build/remodel and then it becomes dated. Full remodels, I imagine, would cost a bit!!
Wow Christin, you did a lot in that time and budget! It was a pretty room to begin with but the added touches really make it great. Smart thinking to spray paint the faucets!
Your bathroom looks gorgeous. My favorite parts are the floor and those beautiful knobs! I have really enjoyed following along. You did such a wonderful job for $100!
Wow! This really came together just beautifully. Great job with all of your paint choices. The mirror frame and the title floor are my favorite projects that you were able to complete.
I love it! The power of paint always, always, always, amazes me!
I love your new floor! Everything came together so nicely! Well done!
This bathroom is gorgeous!!! Your DIYs in the space were awesome. I have NEVER seen a spray painted counter top, and I love the idea of spray painting the facets. And that peel and stick tile looks incredible! I cannot believe it only cost $60. Such a beautiful space! Thank you so much for joining another round of the challenge!
Heck yes! This is one of the funnest things all year! And it makes my husband happy lol
What a transformation! Can’t believe the floor is peel & stick. Looks amazing!
I know, right?! Thanks!!
What a great transformation on a small budget. I especially love the floor! Good job!
Thanks so much Kim! It was worth all the elbow grease!
This turned out so pretty! You did an amazing job & that new vanity hardware really made a big difference!
Christin this turned out so gorgeous! I’m envious of those stenciled floors. Definitely a DIY I need to try one day. Thanks for sharing this gorgeous inspo!
Thanks. They are actually peel and stick tiles! Did the whole floor for $60
Your bathroom turned out amazing!
Thank you!
This is gorgeous and a perfect inspiration for my new house! What is the wall color?
Thank you! It’s Charlotte Slate by Benjamin Moore
Hi! How did the spray paint hold up on ur countertops & faucets? I’m always worried about peeling after a bit of time…
The counters are holding up awesomely! The faucets are still pretty good, but they look a little more worn now after some use. The counters though are really gravest. Just make sure you don’t touch them or put anything on them for 36 hours so it can cure.
Can’t believe this was only $100!! I had a cabinet refinisher update the cabinets in my kitchen and master bathroom a few months ago, and ever since then I’ve had the itch to change up the vanity in my daughter’s bathroom as well as the laundry room and guest bathroom. After seeing your post, it gave me some encouragement that I could upgrade it myself at a reasonable price, so I’m hoping to tackle this project soon!
That’s awesome! Let me know if you have any questions. You can DM me on instagram @myhomierhome for a quick response! Good luck!
What type of paint did you use for the cabinets? And is it just a white?
I Just finished with the countertops and already excited with the transformation.
Nice job!
That’s so exciting! The vanity is trim paint in a color called seize the gray from Clare paint (https://rstyle.me/+xprKZPlWJzgRdGki4ne-Ag) can’t wait to see the final transformation you make! You can tag me on facebook or Instagram @myhomierhome
Love this!! Where did you get the shower curtain?
Thanks! Honestly, I think the shower curtain was a Target find about 10 years ago lol. It has followed us house to house. This one is similar and on sale. 🙂
It’s so beautiful. How has the floor and the counter held up since then? Is it still in great condition?
Thanks! Shockingly they are holding up really well – especially the countertops. I would say the faucets could have used some extra top coat to make them more shiny and seal them better, so I’ll probably change those out in the near future, but the floor and countertops have been doing great!